Creating a new Forge Feedstock#
Warning
The following has not been tested for Windows development. Inconsistencies will be present. (i.e. the directory for token storage)
The following extract from the conda-feedstock is a quick summary on conda-forge and how this organisation relates to feedstocks.
conda-forge is a community-led conda channel of installable packages. In order to provide high-quality builds, the process has been automated into the conda-forge GitHub organization. The conda-forge organization contains one repository for each of the installable packages. Such a repository is known as a feedstock.
Installation of conda-smithy#
Note
It is always advised to ensure conda is up to date when dealing
with conda-related tools. conda update conda
The most reliable way to install conda-smithy, as only one copy of the
package should exist across all environments:
conda install -n root -c conda-forge conda-smithy
Making a New Feedstock#
Creating a new feedstock will make a new package available for installation through the conda package manager. The steps under Making a New Feedstock needs only to be carried out once in all cases. Everything else with regards to a feedstock falls under “feedstock maintenance”.
Note
The following guide follows the creation of a feedstock for
nrlmsise-00. This process should be adapted.
Setting up a basic recipe#
Create a directory which will contain the recipe for the feedstock.
mkdir nrlmsise-00
Every conda-build recipe will generally require the three following files
to be present: 1) meta.yaml, 2) build.sh and 3) bld.bat.
Let’s create them.
touch nrlmsise-00/meta.yaml
The meta.yaml file requires the package name and version in
order to initialise the package.
{% set name = "NRLMSISE-00" %}
{% set version = "0.1" %}

package:
  name: {{ name|lower }}
  version: {{ version }}
Now there’s a concept present here which isn’t strictly necessary: templating
through the use of Jinja. This just allows for the definition of variables
which can be reused throughout the yaml file. The effect of the above will
be the following after template rendering:
package:
  name: nrlmsise-00
  version: 0.1
Finally, create the last two required files for the feedstock initialisation.
touch nrlmsise-00/build.sh && touch nrlmsise-00/build.sh
We can now initialise the nrlmsise-00-feedstock:
conda smithy init nrlmsise-00(base) ggarrett@space-station:~/tudat-space$ conda smithy init nrlmsise-00/ No azure token. Create a token and put it in ~/.conda-smithy/azure.token No numpy version specified in conda_build_config.yaml. Falling back to default numpy value of 1.11 WARNING:conda_build.metadata:No numpy version specified in conda_build_config.yaml. Falling back to default numpy value of 1.11 Initialized empty Git repository in /home/ggarrett/tudat-space/nrlmsise-00-feedstock/.git/ [master (root-commit) 73bf19e] Initial feedstock commit with conda-smithy 3.7.4.dev54. 4 files changed, 4 insertions(+) create mode 100644 conda-forge.yml create mode 100644 recipe/bld.bat create mode 100644 recipe/build.sh create mode 100644 recipe/meta.yaml Repository created, please edit conda-forge.yml to configure the upload channels and afterwards call 'conda smithy register-github' (base) ggarrett@space-station:~/tudat-space$ ls nrlmsise-00 nrlmsise-00-feedstock
Success! We have initialised our first feedstock, although you can notice two
potential points of concerning numpy and the lack of an azure token.
This will be both addressed.
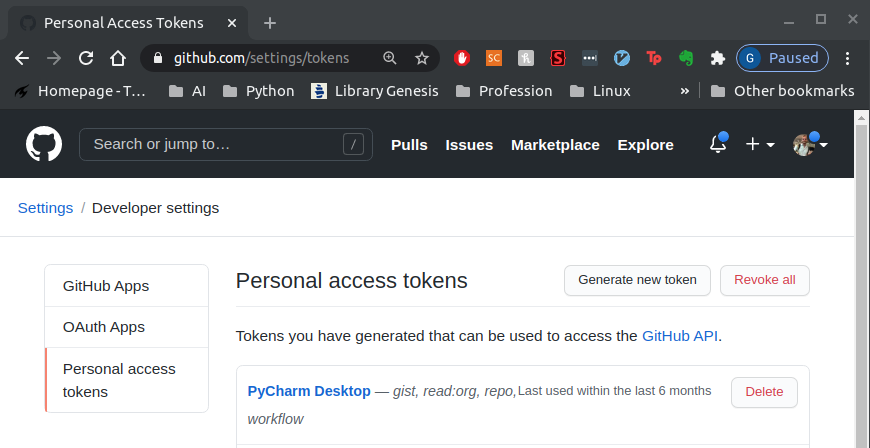
Generating Github token#
If you’re familiar with retrieving a personal access token from Github, you
can skip ahead to Setting up the Github repo. The following screen capture
will give you your bearings on generating the access token:
Settings/Developer settings.
Setting up the Github repo#
Note
Your personal access token from Github will provide conda-smithy
with the required permissions to register a repo in your organisation,
as long as your account has the correct permissions to the
organisation. Save the token in the file: ~/.conda-smithy/github.token
conda smithy register-github --organization tudat-team ./nrlmsise-00-feedstock
(base) ggarrett@space-station:~/tudat-space$ conda smithy register-github --organization tudat-team ./nrlmsise-00-feedstock
No azure token. Create a token and
put it in ~/.conda-smithy/azure.token
No numpy version specified in conda_build_config.yaml.  Falling back to default numpy value of 1.11
WARNING:conda_build.metadata:No numpy version specified in conda_build_config.yaml.  Falling back to default numpy value of 1.11
Adding in variants from internal_defaults
INFO:conda_build.variants:Adding in variants from internal_defaults
Created tudat-team/nrlmsise-00-feedstock on github

Repository registered at github, now call 'conda smithy register-ci'
git push upstream master
Generating Azure token#
Now it’s time to generate our Azure token for the organisation.
Sign in to your organization in Azure DevOps (https://dev.azure.com/{yourorganization})
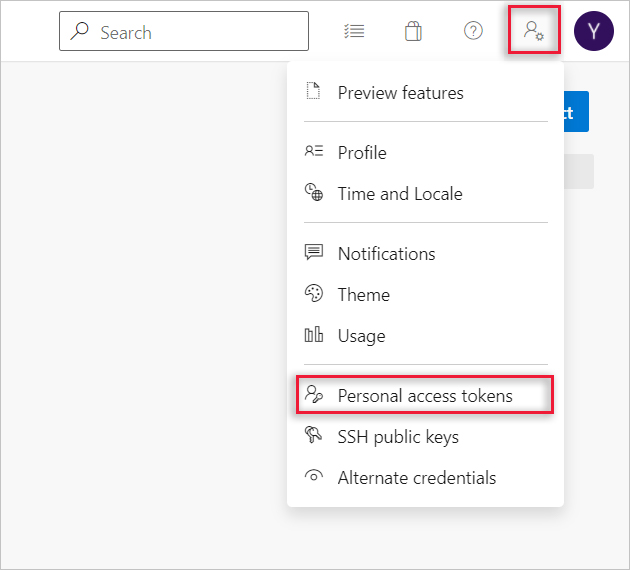
From your home page, open your user settings, and then select Personal access tokens.
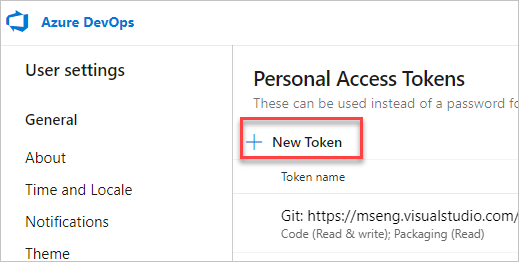
And then select + New Token.
Name your token, select the organization where you want to use the token, and then choose a lifespan for your token.
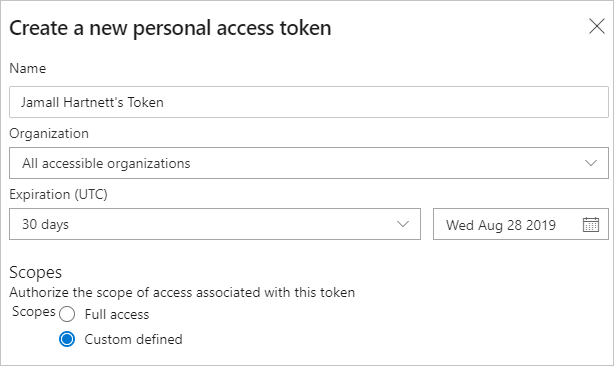
When you’re done, make sure to copy the token. For your security, it won’t be shown again. Use this token as your password.

conda smithy register-ci --organization tudat-team --feedstock_directory ./nrlmsise-00-feedstock